How to Putt in Disc Golf: Grip, Stance, and Drills That Actually Work

Quick Comparison
| Product | Best For | Price |
|---|---|---|
The best portable practice basket for serious putting practice at home | Check Price | |
The most proven putting putter in disc golf history with a straight, reliable flight | Check Price | |
A modern beadless putter with a firm hand feel and reliable fade | Check Price |
The best portable practice basket for serious putting practice at home
Check Price on AmazonThe most proven putting putter in disc golf history with a straight, reliable flight
Check Price on AmazonA modern beadless putter with a firm hand feel and reliable fade
Check Price on AmazonIf you want to know how to putt in disc golf, here is the honest truth: putting is the fastest way to shave strokes off your score, and almost nobody practices it enough. You can bomb 400-foot drives all day, but if you are missing putts inside the circle, you are leaving strokes on the course every single round.
The good news is that putting is the most accessible skill in disc golf. You do not need athletic ability, a huge arm, or perfect weather. You need a basic understanding of mechanics, a putter you trust, and 20 minutes of focused practice a few times a week. That is it.
This guide breaks down everything you need to know about disc golf putting - from grip styles and stances to the actual putting motion, step-by-step drills, and the most common mistakes that are costing you strokes. Whether you are brand new or stuck in a putting rut, you will walk away with a clear plan to get better.
Why Putting Matters More Than Distance
Here is a number that should change how you practice: the average recreational disc golfer takes between 18 and 22 putts per round on an 18-hole course. That is roughly 40% of all your throws. Compare that to maybe 18 drives and 10-14 approach shots. Putting is literally the largest category of throws you make.
Professional disc golfers make over 90% of their putts inside Circle 1 (33 feet or closer). Recreational players? Most hover around 50-60%. That gap between 60% and 90% on putts you are already close enough to make represents 5-8 strokes per round. No amount of distance training will close that gap - only putting practice will.
The other thing about putting is that it builds confidence that cascades through your entire game. When you trust your putt inside 25 feet, your approach shots become less stressful. When your approaches are less stressful, your drives become more relaxed. Everything flows from a solid putting game.
Putting Fundamentals: The Basics Every Player Needs
Before we get into step-by-step technique, you need to understand the three building blocks of a good putt: grip, stance, and motion. Get these right and everything else falls into place.
Grip: How to Hold the Disc
Your putting grip is different from your driving grip. You are not trying to generate maximum spin or power - you want control, consistency, and a clean release. There are three main putting grips, and the best one is whichever feels most natural in your hand.
Fan Grip (Most Popular for Putting)
Spread your fingers out underneath the disc so they fan across the flight plate. Your index finger extends toward the rim, your other fingers spread naturally behind it, and your thumb presses down on top. This grip gives you maximum control and a smooth, consistent release. Most professional putters use some version of a fan grip.
The fan grip works well because it reduces the variables. With your fingers spread wide and flat, the disc sits securely in your hand without requiring much grip pressure. Less grip pressure means a cleaner release.
Modified Fan Grip
A slight variation where you curl your fingertips inward so they grip the inside edge of the rim rather than laying flat on the flight plate. This gives you a bit more spin on the disc while keeping most of the control benefits of a full fan grip. If you feel like your putts are dying short or getting pushed around by wind, try the modified fan.
Power Grip (Less Common for Putting)
All four fingers curl tightly under the rim, just like a driving grip. This generates more spin and is sometimes used by spin putters (more on that in a moment). The trade-off is less control and a harder time getting a clean release. Most putting coaches recommend against a full power grip for putting, but some players make it work.
Which grip should you choose? Start with the fan grip. It is the most forgiving for beginners and the most popular among professionals. If after a few weeks of practice it does not feel right, experiment with the modified fan. Only go to a power grip if you are committed to spin putting and have trouble generating enough spin with the other grips. The grip will also feel different depending on your putter - softer plastics like the Innova DX Aviar are more forgiving for the fan grip than firmer plastics.
Stance: Setting Up for Consistency
Your stance determines your balance, power generation, and alignment. There are two main putting stances, and many players use both depending on the situation.
Staggered Stance (Most Common)
Place one foot in front of the other, with your dominant-side foot forward (right foot for right-handed players). Your feet should be roughly shoulder-width apart. Most of your weight starts on your back foot and transfers forward as you putt.
The staggered stance is the go-to for most players because it naturally creates forward momentum toward the basket. That weight transfer from back foot to front foot is where a lot of your putting power comes from - especially on longer putts. Think of it like a basketball free throw: you rock forward and release as your weight shifts.
Straddle Stance
Both feet are side by side, roughly shoulder-width apart, with your body facing the basket squarely. Weight starts centered and you generate power by pushing up from your legs.
The straddle is easier to balance in and gives you a more repeatable motion on short putts. It is also the better choice on uneven lies, uphill putts, or when you have an obstacle behind your lie that prevents a staggered setup. Many players use a straddle inside 15 feet and switch to staggered for longer putts where they need more power.
Key stance tips regardless of style:
- Keep your knees slightly bent, never locked
- Stay relaxed through your shoulders and arms
- Align your body toward the target - not off to one side
- Keep your weight forward on your toes, not back on your heels
The Putting Motion: Push Putt vs Spin Putt
This is where disc golf putting gets interesting. There are two fundamental putting styles, plus a hybrid that many modern players prefer.
Push Putt
The push putt emphasizes lofting the disc toward the basket with minimal spin. Your arm pushes forward and upward, almost like you are handing someone the disc from 20 feet away. The wrist stays relatively still and the power comes from your legs and the forward push of your arm.
Pros: Softer landings on the basket, shorter comeback putts on misses, easier to control distance, more forgiving of slight release angle errors.
Cons: Less effective in wind (the disc floats more and gets pushed around), harder to reach on longer putts, requires strong legs and good weight transfer.
Spin Putt
The spin putt generates significant disc rotation by snapping your wrist during the release. Your arm still pushes forward, but the wrist flick adds spin that keeps the disc stable in the air. Spin putts tend to fly on a flatter trajectory.
Pros: Better in windy conditions, more power on longer putts, the spin stabilizes the disc through turbulence, flatter flight line.
Cons: Harder to control distance (misses fly farther past the basket), more moving parts mean more variables that can go wrong, takes longer to develop consistency.
If you spin putt and play in heavy wind, an overstable approach disc like the Discraft Zone doubles as a wind putter for those 25-40 foot putts where a regular putter would get pushed around.
Spush Putt (The Hybrid)
Most competitive players today throw some version of a hybrid - a push putt with a touch of wrist action added. The community calls this a "spush" putt. You get the soft, controlled flight of a push putt with just enough spin to keep the disc stable and penetrate light wind.
The spush putt is what I recommend for most players. It gives you the accuracy and soft misses of push putting with enough spin to handle moderate wind and extend your range past 30 feet. Start by learning a clean push putt, then gradually add wrist action until you find the blend that works for you.
Step-by-Step Putting Technique
Now let's put it all together. Here is a repeatable putting routine you can use from anywhere inside the circle.
Step 1: Set Your Stance and Find Your Line
Walk up to your lie and set your front foot (staggered) or both feet (straddle). Take a breath. Look at the basket and pick a specific link in the chains you want to hit - not "the basket" in general, but one specific chain link. Having a precise target shrinks your margin of error.
Plant your feet and check that your body is aligned toward that target. Shift your weight to your back foot (staggered) or center it (straddle). The disc should start around waist height, held comfortably in your putting grip.
Step 2: Focus on the Target
Before you start your motion, lock your eyes on your target chain link. Do not look at the disc. Do not look at the ground. Do not look at the band on top of the basket. Stare at that one specific chain link the entire time.
This sounds simple but it is the single biggest difference between good putters and inconsistent ones. Your body naturally throws where your eyes are looking. If your eyes drift, your putt drifts.
Step 3: The Load and Forward Push
With your eyes locked on the target, bring the disc down and slightly back - this is your "load" position. For a push putt, the disc drops to about hip level. Your knees bend slightly to load your legs.
Now push forward and upward in one smooth motion. Your legs drive upward, your arm extends toward the target, and the disc releases as your arm reaches full extension. Think about pushing the disc up and out on a gentle arc toward the chains. The nose of the disc should be angled slightly upward - you want the disc to fly on a slight upward arc and fall into the chains, not rocket at them on a flat line.
Step 4: Follow Through
After the disc leaves your hand, your arm should continue forward toward the basket. Your fingers should end up pointing at your target. If your hand finishes pointing left, right, or down, your release was off.
A good follow-through looks like you are reaching out to shake hands with the basket. Your weight should be fully on your front foot (staggered) or up on your toes (straddle). Hold your finish position for a second - this builds muscle memory and helps you diagnose any issues with your form.
How to Putt in Disc Golf: Drills That Actually Work
Knowing the technique is only half the battle. You need to build muscle memory through repetition. Here are six putting drills that range from beginner-friendly to competition-level practice.
The 10-Foot Confidence Builder
Distance: 10 feet from the basket
Reps: 25 putts
Goal: Make 23 out of 25 (92%)
Start close and build confidence. This is not about challenging yourself - it is about grooving your release and building the feeling of chains hitting every time. If 10 feet feels too easy, good. That is the point. You are programming your brain and body to expect success. Do not move farther back until you can consistently hit 90%+ from this distance.
Circle of 5
Distance: 15 feet from the basket
Setup: Place 5 discs in a semicircle around the basket at equal intervals (a 5-pack of identical putters like the Innova DX Aviar makes this drill cheap and easy to set up)
Goal: Make all 5 before moving back to 20 feet, then 25 feet
Start at 15 feet and putt all 5 discs. If you make all 5, collect them and set up a semicircle at 20 feet. Make all 5 again and move to 25 feet. If you miss at any distance, go back to the previous distance and start over. This drill builds pressure handling because each putt matters more as you advance.
The 21 Game
Distance: Varies (15-30 feet)
Players: 1 or more
Rules: Make a putt = 1 point, hit cage/band = -1 point, first to 21 wins
This is the most popular putting game in disc golf for a reason. The penalty for hitting metal (not chains) forces you to aim at the center of the chains rather than just throwing at the basket. When you play against yourself, keep track of your scores over time. A good benchmark is reaching 21 in under 30 attempts.
Distance Ladder
Distance: 10 feet, then increase by 5 feet each round
Reps: 5 putts per distance
Goal: Find your "make or miss" distance
Start at 10 feet and throw 5 putts. Move back to 15, then 20, then 25, and keep going until you are missing more than you make. The distance where you first drop below 50% is your current "edge." This drill shows you exactly where your putting range ends and where you need to focus your practice.
Jump Putt Practice
Distance: 33-50 feet (outside Circle 1)
Reps: 20 putts
Goal: Land within 10 feet of the basket consistently
For putts outside the circle (33+ feet), you are allowed to jump as part of your putting motion as long as you release the disc before your feet leave the ground. Practice this by setting up just outside 33 feet and adding a small hop to your push putt. The key is releasing the disc at the peak of your upward motion - before your feet leave the ground.
Jump putting is a separate skill from regular putting, and practicing it specifically will save you strokes on long approaches where you are too close to throw but too far to stand-still putt.
Pressure Putting
Distance: 20-25 feet
Setup: 10 discs
Goal: Make 7 out of 10 to "win," start over if you miss 4
This simulates tournament pressure. Set 10 discs at 20-25 feet and putt them one at a time. You need to make at least 7 to "win" the round. If at any point you have missed 4 discs, you lose and start the entire set over. The pressure ramps up with each putt because every miss brings you closer to restarting. This is the closest you can get to tournament nerves in a practice setting.
Common Putting Mistakes to Avoid
Even with good technique, these mistakes will sabotage your putting game. Here is what to watch for and how to fix each one.
Mistake 1: Looking at the Basket Instead of a Specific Target
Aiming at "the basket" is like aiming at "the dartboard." Pick one chain link - ideally one of the center chains at about chest height - and stare at it through your entire putting motion. This alone can improve your accuracy by 10-15% almost immediately.
Mistake 2: Rushing Your Routine
You step up, grab the disc, and throw. No pause, no breath, no target selection. Rushing leads to inconsistent setup, sloppy footwork, and poor alignment. Develop a consistent pre-putt routine: set your feet, pick your chain, take one breath, then putt. The same routine every time.
Mistake 3: Gripping Too Tight
A death grip on the disc creates tension in your forearm, wrist, and shoulder. That tension leads to jerky releases and poor follow-through. Hold the disc firmly enough that it will not slip, but loose enough that your wrist can move freely. Think "firm handshake," not "trying to crush a walnut."
Mistake 4: Leaning Back on the Release
If your weight is on your back foot or heels when you release, you are robbing yourself of power and accuracy. Your momentum should be moving toward the basket through the entire putt. Finish on your toes or your front foot. If you are falling backward after a putt, your weight transfer is backwards.
Mistake 5: Nose-Down Release
A nose-down release causes the disc to dive into the ground short of the basket. This usually happens when you push the disc forward without enough upward angle. Think about pushing the disc up toward the top of the chains, not straight at the basket. A slight nose-up angle gives the disc the loft it needs to reach the chains and drop in.
Mistake 6: Changing Your Putt Under Pressure
You have a smooth, confident putting stroke in practice. Then you step up to a 15-footer to save par in a tournament and suddenly your motion speeds up, your release point changes, and you pull the putt left. The fix for this is not mental - it is mechanical. Practice under simulated pressure (see the Pressure Putting drill above) until your body defaults to good mechanics even when your brain is screaming.
Recommended Putting Gear
You do not need much to start practicing your putting, but the right gear makes a big difference. Here are three items that will accelerate your improvement.
MVP Black Hole Pro Disc Golf Basket
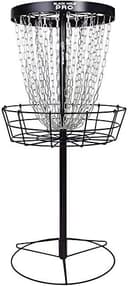
MVP Black Hole Pro 24-Chain Portable Disc Golf Basket
The best portable practice basket for serious putting practice at home
Pros
- 24-chain design catches like a real course basket
- Breaks down for portability without tools
- Heavy-duty construction that lasts for years
- Regulation height for realistic practice
Cons
- Heavier than budget baskets (around 40 lbs)
- More expensive than entry-level options
- Chains can be noisy for close neighbors
If you are serious about improving your putting, a practice basket at home is the single best investment you can make. The MVP Black Hole Pro is the gold standard for portable baskets. Its 24-chain setup catches discs like a real course basket, and the build quality is excellent for the price. It assembles and breaks down quickly if you need to move it, but it is sturdy enough to leave set up in your yard permanently.
The Black Hole Pro catches better than cheaper baskets because it has both inner and outer chains that work together to absorb the disc's momentum. Cheap baskets with fewer chains produce "spit-outs" that would have been caught on a real basket, which teaches you bad habits and hurts your confidence.
Innova DX Aviar
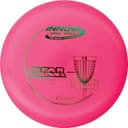
Innova DX Aviar Putt and Approach
The most proven putting putter in disc golf history with a straight, reliable flight
Pros
- Proven by decades of professional use
- DX plastic is grippy and affordable
- Dead-straight flight reveals form issues
- Available everywhere for under $10
Cons
- DX plastic beats in faster than premium plastics
- The beaded rim is not for everyone
- Flight changes as the disc wears
The Innova Aviar is the best-selling putter of all time, and for good reason. It flies dead straight with a gentle fade at the end, which means it rewards good form and punishes bad form - exactly what you want in a practice putter. The DX plastic is grippy in all conditions and has a slightly tacky feel that many putters prefer.
The Aviar has won more World Championships than any other putter mold. Its flight is predictable in a way that builds trust - when you miss, you know it was your release and not the disc. Start with 3-5 DX Aviars in the 170-175g range for putting practice. Heavier putters are more resistant to wind and give you a more consistent feel.
Discraft Luna
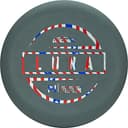
Discraft Paul McBeth Luna Putter
A modern beadless putter with a firm hand feel and reliable fade
Pros
- Beadless rim feels clean on release
- Consistent, predictable overstable fade
- Multiple plastic options for different feels
- Designed specifically for putting consistency
Cons
- More expensive than basic DX putters
- Overstable flight may not suit everyone
- Jawbreaker plastic can get scuffed up quickly
The Luna is Paul McBeth's signature putter, designed from scratch to be the most consistent putting disc he could imagine. It has a beadless rim that many players prefer over the Aviar's beaded edge - it just feels cleaner coming out of the hand. The slightly overstable flight means it finishes with a predictable fade, which is great for putts where you need the disc to hook toward the basket at the end.
If you have tried beaded putters and they feel wrong in your hand, the Luna might be your answer. The Jawbreaker plastic blend is especially popular for putting because it has a soft, grippy feel similar to DX but with a bit more durability.
Final Thoughts
Learning how to putt in disc golf comes down to three things: understand the mechanics, pick a style that feels natural, and practice with intention. You do not need to reinvent the wheel. Pick a grip (start with the fan grip), choose a stance (staggered is the default for most players), and decide whether you want to push putt, spin putt, or blend the two.
Then practice. Not casually - with purpose. Use the drills in this guide to build muscle memory from close range and work your way back. Track your percentages. Simulate pressure. The players who putt well in tournaments are the ones who have made that same 20-foot putt a thousand times in their backyard.
If you take one thing from this entire guide, let it be this: putting is the most improvable skill in disc golf, and a practice basket in your yard will do more for your score than any new driver ever will. Set up 10 feet away, putt 25 times, and build from there. Your scorecard will thank you.
For more on choosing the right putter for your hand and game, see our best disc golf putters comparison and top rated disc golf putters reviews. If you are budget-conscious, the Innova DX Aviar at around $10 remains the best value in disc golf - one of the few discs where the cheap option is also the smartest option.
Affiliate Disclosure
This post contains affiliate links. As an Amazon Associate, Pine Tree Disc earns from qualifying purchases at no additional cost to you. Learn more